The computer keeps records of all user actions. PC specialists know how to view the history, what applications and files were launched, as well as all the user’s work on the Internet. Beginner users can also master this feature. This knowledge is especially recommended for parents who want to know what their child is doing on the computer.
Ways to view history
To view the latest actions on the computer, just for this purpose there are not only standard ways of viewing the computer history using the operating system itself, but also special ones - with advanced capabilities, implemented by additional programs. The main ways to study computer history are by viewing:
- browser history;
- history of working on the Internet using a service from Google;
- objects “Recent Documents”, “Trash”, “Downloads”;
- file attributes: modification date and opening date;
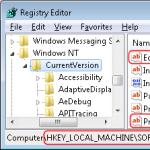
- built-in Windows Journal operating system application.
For a detailed analysis of computer operation, third-party programs are used that have extensive capabilities for tracking user actions.
Visiting pages on the Internet
When answering the question of how to see where you have accessed from your computer, it should be noted that to do this, they analyze the history of your work on the Internet. They do this as follows:

Recent Documents, Trash and Downloads
It is recommended to check the “Recent Documents”, “Trash”, “Downloads” objects, the contents of which sometimes give surprises. To display the “Recent Documents” list in Windows 7, you need to configure the system:
- Right-click on the “Start” menu and select “Properties” from the context menu.
- In the “Taskbar and Start Menu Properties” dialog box that appears, select the “Start Menu” tab.
- Select the “Customize” button, and in the dialog box that opens, check the box next to the “Recent Documents” menu item.
After these steps, the “Recent Documents” tab will appear in the “Start” menu, containing a list of recently used documents.
Users look at the Downloads folder, where downloaded files are saved by default. To view the list of downloaded files in the browser, press Ctrl + J.
View file attributes
It is interesting to know how to view history on a Windows 7, 8, 10 computer using the new file attribute showing the date the document was last opened. To view, right-click on the file and select “Properties” in the menu that opens, which provides information about the creation, modification and date of the last opening of the document.

Using the “Search” service (Win + F) with the “Date of modification” attribute, search for all files modified for a given date:
- Users open the file viewer "My Computer" or "Computer" for short.
- In the upper right corner, find the “Find” text field, click on it with the mouse and in the menu that appears, select search by “Date of modification”.
- It offers a search both by specific date and by range: week, month, year.
- You can search by file size.

For example, to view recently watched movies on this computer, you need to:
- In the search window, set the file size parameter: “Giant” (more than 128 MB). As a result, all “Giant” files on this computer will be found, including almost all movies.
- Right-click on files to open a menu containing last opened date information.
- If there are a lot of movies, then in the search window change the file viewing type to “Table”.
- By right-clicking on the table header, open a menu where you can select an additional table column: “Date of use” or “Date of opening”.
- Click on the header of the newly created column, thereby organizing the files by viewing date.
Events in the Windows log
The Windows system keeps a log to store system messages: about turning the computer on and off, program errors, system events, and security problems. Using this log, you can find out the time the computer turned on and off, down to the second.

Opening the Windows Event Log is done in several ways:
- Press the key combination Win + R and in the window that opens, enter the name of the program in English: Eventvwr. The Event Viewer window opens.
- Open the “Start” menu and in the “Search programs and files” window enter the text: “Event Viewer”. The program of the same name will be found, and when opened, the Event Viewer window will open.
To view your computer's operating time, you must:
- In the open “Event Viewer” window, select “Windows Log”, a table of Windows event data will open.
- In this table, in the “Source” column, find the EventLog sources. In these events, find information about turning on and off the PC.
Help from third party programs
To expand the capabilities of monitoring the operation of a computer, special programs are installed, one of the best is NeoSpY.

NeoSpY allows you to track:
- keystrokes, which allows you to find out passwords;
- monitor screen, through screenshots;
- contents of the clipboard, i.e. what was copied;
- work on the Internet: where they climbed and what they discovered;
- operation of Skype, ICQ, QIP and other instant messengers (by intercepting traffic);
- files copied to a flash drive;
- printer, and what documents were printed;
- new installed programs;
- changes in system files.
NeoSpY can send all statistics via email, which makes it even more attractive.
There is a function that saves user data. It's called "File History". With it, you can restore an erased drawing, photo, contact, bookmark at any time. Whatever. All previously created versions of documents will be copied to the external drive. This way you can return them to their original state if you accidentally made the wrong changes. In Windows 10, File History has become a convenient and accessible tool for backup and caching.
This option is present in various forms in many operating systems. In MacOS it is called "Time Machine". In Win 7 there is a certain analogue of this function - shadow copying. With it, you can return the previous version of the document if it was changed incorrectly.
The first system from Microsoft to which file history was added was Windows 8. It was in this OS that it became possible to set up backup on an external drive. Before this, backup copies were stored in the same place as the originals. And if the hard drive failed, it was difficult to restore documents.
However, the option was mainly used by customizers and system administrators. It has been improved in Windows 10. Then ordinary users also became interested in it.
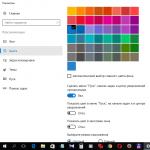
How to turn it on?
By default, File History is not active. For it to work, you need an external hard drive, storage device, flash drive, network storage or any other media. It is important that it has enough memory to copy data.
How to recover files from history?
Thanks to this function, lost, damaged, deleted, changed or forgotten information can be restored.
- In the window of the folder in which the erased document was previously located, click on the “Home” button in the menu bar.
- Click on the “Journal” icon. It looks like a watch folder. It can also be found in Windows Explorer.

Click on the “Journal” icon
- A window with data will open. To do this, the Windows 10 file history drive must be connected.
- To select copies, scroll the work area to the right or left. When you click on one of them, the date it was added to the archive will be displayed at the top.
- Select the documents you want to return. To cover several at once, click on them with the mouse while holding down the Ctrl key.
- Click on the “Restore” button. It looks like a circular arrow.
The method is suitable for both Win 8 and 10.
The same can be done in the history menu (which is in the Control Panel). Click on the line “Restore Personal Files”. It's on the left.
Many operating systems allow you to back up your data. In Windows 8 and 10 this process is automated. Documents are saved to disk at certain time intervals. For example, you will be able to look at the previous version of the report if it has been rewritten. Or restore a damaged video, photo, presentation. And just put it back in place
All the pages we view on the Internet are recorded in a special log. And if someone sits down at our computer, they can get into it. This means he will be able to see all the places we visited, and even read the correspondence.
This journal is called History and, fortunately, entries from it can be deleted.
How to clear history on your computer
Google Chrome. To erase your browsing history in Chrome, you need to click on the button with three dots. It is located in the upper right corner, under the “Close” button (red cross).
Select “History” and “History” again.

A list of Internet pages that have been recently visited opens. You can remove individual addresses from it. To do this, click on the small arrow button next to the page title and select “Remove from history.”

And if you need to remove all pages for a certain period of time (for example, today), click on the clear button at the very top of the list.

A small window will appear. At the top, select a time period and mark with birds what exactly needs to be removed.

Yandex. To clear your browsing history, click on the small button with horizontal lines in the upper right corner and open History.

If you need to delete one page, hover the cursor over it and click on the small arrow that appears. From the list, select “Delete from history.”

And if you need to erase more data from Yandex, click on “Clear history” on the right above the list of sites.

In the window that appears, select a time period and indicate what exactly needs to be deleted.

Opera. Menu (topmost button on the left) - History

To delete a specific page in the list, hover the cursor over it and click on the cross on the right.

If you need to erase more entries, click on “Clear history...” in the upper right.

In the window, select the time period and data type. It is better to leave three birds, as in the picture below.

Mozilla Firefox. - Journal - Delete history...

And 
In the window, select the time and data that you want to erase. I recommend leaving only three birds, as in the picture:

To delete pages manually (when you only need to erase a couple of addresses), go to the full version of the journal: - Journal - Show the entire journal. And there we delete them individually using the right mouse button.
Internet Explorer. - Security - Delete browsing history…


To clear by day: - “Log” tab. We delete the necessary pages or days/weeks using the right mouse button.
Important
This way we erase log entries, information about downloads and clear the browser memory (pages, photos, videos). But all passwords and logins that the program remembers remain in place.
This means that if you, for example, logged into your mail or Odnoklassniki/Contact/Facebook without entering any logins or passwords, then everything will remain that way. And anyone at this computer will be able to do the same: type the address and open your page. That is, he will get full access - he will be able to read the correspondence, delete something, add something.
To prevent this from happening, you need to erase cookies and passwords. And for global cleaning, there’s also everything else. This is done by checking certain boxes in the deletion box.

And all because many users do not remember, and some do not even know, their login passwords. And after such cleaning, they are unable to log into their pages and mail. And then they write to me: save me, help me, what should I do?! But nothing can be done - previously you had to think and connect your mobile number to each page and mail.
How to prevent sites from being included in history
Now every browser has a special private mode, the so-called Incognito. You can open your program for the Internet in this mode and then nothing will be captured. But everything will work as before: sites will open, files will be downloaded, bookmarks will be added.
Immediately after exiting incognito mode, the browser will erase everything that happened there:
- entered passwords
- cookies
- search queries
- URLs of visited pages
Note: this will not protect you from viruses or make you invisible on social networks.
How to open anonymous mode
Google Chrome. - New window in incognito mode
Yandex. - Advanced - New window in Incognito mode
Opera. - Create a private window
Mozilla Firefox. - Private window
Internet Explorer. - Security - InPrivate Browsing
"How to clear history on your computer
files and documents to open."
The moment you open documents on your personal computer, view photos, or play a video, all these files are stored in the list of recently opened documents, which can be easily accessed using the menu Start - Recent Documents.
If you do not want anyone to see which documents you are viewing, then this list of recent documents is best cleared.
If the menu item "Recent Documents" you don’t have it, it means it’s disabled in the settings. How to include it in the menu Start, written at the end of this lesson.
To clear the list of recent documents, click on the button Start and in the menu that opens, right-click on the item "Recent Documents". Then you need to select the item "Clear list of recent items".
After this, the list of recently created documents will be cleared. By the way, the user may not clear this list completely, but independently delete only certain lines from it.
In order to do this you need to go to the menu Start - Recent Documents and select the document you want to delete. Now all you have to do is right-click on it and select "Delete". All other lines that are in this list will be saved, and the one you selected will be deleted without a trace.

If on your menu Start missing item "Recent Documents", then you can return it. To do this, right-click on the menu Start, select the item there "Properties" and in the window that opens, click the button "Tune".