Many people like variety and originality, and PC users are no exception. In this regard, some users are not satisfied with the standard appearance of the mouse cursor. Let's figure out how to change it on Windows 7.
You can change cursor pointers, like performing most other actions on a computer, in two ways: using third-party programs and using the built-in capabilities of the operating system. Let us consider in more detail the possibilities of solving the problem.
Method 1: CursorFX
First of all, let's look at methods using third-party applications. We’ll start the review with probably the most popular program for changing the cursor – CursorFX.
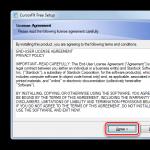
- After downloading the installation file for this program, you should install it. Activate the installer, in the window that opens you will need to accept the agreement with the developer by clicking "Agree".
- Next, you will be prompted to install an additional software product. Since we don’t need this, uncheck the box next to the inscription "Yes" and press "Next".
- Now you need to specify which directory you want to install the application in. By default, the installation directory is the standard program folder on disk C. We recommend that you do not change this parameter and click "Next".
- After clicking on the specified button, the application installation procedure will be performed.
- After its completion, the CursorFX program interface will open automatically. Go to section "My cursors" using the left vertical menu. In the central part of the window, select the shape of the pointer you want to install and click "Apply".
- If simply changing the shape does not satisfy you and you want to more precisely customize the cursor to your preferences, then go to the section "Options". Here by dragging the sliders in the tab "View" you can set the following settings:
- Hue;
- Brightness;
- Contrast;
- Transparency;
- Size.
- In the tab "Shadow" In the same section, by dragging the sliders, it is possible to adjust the shadow cast by the pointer.
- In the tab "Options" You can adjust the smoothness of movement. After setting the settings, do not forget to press the button "Apply".
- Also in the section "Effects" You can select additional scenarios for displaying the pointer when performing a specific action. For this purpose in the block "Current Effects" select the action that will execute the script. Then in the block "Possible Effects" choose the script yourself. After selecting, click "Apply".
- In addition, in the section "Pointer Trail" You can choose the trail that the cursor will leave behind when moving around the screen. After choosing the most attractive option, click "Apply".


This method of changing cursors is probably the most variable of all the methods for changing the pointer that are presented in this article.
Method 2: Create your own index
There are also programs that allow the user to draw the cursor he wants. Such applications include, for example, RealWorld Cursor Editor. But, of course, this program is more difficult to master than the previous one.
- After downloading the installation file, run it. A welcome window will open. Click "Next".
- Next, you need to confirm your acceptance of the license terms. Set the radio button to position "I agree" and press "Next".
- In the next window, check the box next to "Support translations via language packs". This will allow you to install a set of language packs along with the installation of the program. If you do not perform this operation, the program interface will be in English. Click "Next".
- Now a window opens where you can select a folder to install the program. We advise you not to change the basic settings and just click "Next".
- In the next window, all that remains is to confirm the start of the installation procedure by clicking "Next".
- The RealWorld Cursor Editor installation process is in progress.
- After it is completed, a window will appear indicating successful completion. Click "Close" ("Close").
- Now launch the application in the standard way by clicking on its shortcut on the desktop. The main RealWorld Cursor Editor window opens. First of all, you should change the English-language application interface to the Russian-language version. For this purpose in the block "Language" click "Russian".
- After this, the interface will be changed to the Russian version. To proceed to creating an index, click on the button "Create" in the side menu.
- A window for creating an index opens, where you can choose which icon to create: a regular one or from a ready-made image. Let's choose, for example, the first option. Select an item "New cursor". On the right side of the window, you can select the canvas size and color depth of the icon to be created. Next click "Create".
- Now, using the editing tools, you draw your icon, following the same drawing rules as in a regular graphics editor. Once it is ready, click on the floppy disk icon on the toolbar to save it.
- The save window opens. Go to the directory where you want to save the result. You can use the standard Windows pointer folder for storage. This will make it easier to position the cursor in the future. This catalog is located at:
C:\Windows\Cursors
In field "File name" Give your pointer a random name. From the list "File type" select the desired file format option:
- Static cursors (cur);
- Multilayer cursors;
- Animated cursors, etc.
Then apply "OK".


The pointer will be created and saved. How to install it on your computer will be discussed when considering the next method.
Method 3: Mouse Properties
You can also change the cursor using system capabilities via "Control Panel" in mouse properties.
- Click "Start". Go to "Control Panel".
- Choose a section "Equipment and Sound".
- Go by item "Mouse" in the block "Devices and Printers".
- The mouse properties window opens. Move to the tab "Pointers".
- To select the appearance of the pointer, click on the field "Scheme".
- A list of different cursor appearance schemes opens. Select your desired option.
- After selecting an option in the block "Settings" The appearance of the cursor of the selected scheme will be displayed in various situations:
- Main mode;
- Selecting help;
- Background mode;
- Busy, etc.

If you are not satisfied with the presented appearance of the cursor, then change the scheme again to another, as shown above. Do this until you find an option that satisfies you.
- In addition, you can change the appearance of the pointer inside the selected diagram. To do this, select the setting ( "Basic mode", "Choose help" etc.) for which you want to change the cursor, and click on the button "Review…".
- A window for selecting an index in a folder opens "Cursors" in the directory "Windows". Select the cursor option that you want to see on the screen when installing the current scheme in the specified situation. Click "Open".
- The pointer will be changed within the schema.

In the same way, you can add cursors with the extension cur or ani, downloaded from the Internet. You can also install pointers created in specialized graphic editors, such as the RealWorld Cursor Editor, which we talked about earlier. After the index has been created or downloaded from the network, the corresponding icon must be placed in the system folder at the following address:
C:\Windows\Cursors

Then you need to select this cursor, as described in the previous paragraphs.
- When you are satisfied with the resulting appearance of the pointer, in order to use it, click on the buttons "Apply" And "OK".


As you can see, the mouse pointer in Windows 7 can be changed either using built-in OS tools or using third-party programs. The option using third-party software provides more opportunities for changes. Separate programs allow not only installation, but also creation of cursors through built-in graphic editors. At the same time, many users are satisfied with what can be done using internal OS tools for managing pointers.
We use a mouse every day while working with a computer. The usual and inconspicuous cursor arrow has long been boring, and many would like to replace it with a more interesting and attractive pointer.
Now this problem of dull design can be easily solved with the help of our website. There is a wide range of different cursors available here, which you can download absolutely free. Interesting figures, fruits, vegetables, miniature animals, hi-tech cursors - this is not a complete list of options presented on the site.
Cursors for Windows are absolutely free, so you don’t need to spend money to make your computer look original and unique. Before downloading the option you like, you can first study the entire range of the site and only after that, decide which design suits you.
Installing cursors for Windows is very simple; all you need to do is click the mouse button and enjoy the result. These incredibly interesting designs are suitable for any Windows operating system and will make working on your computer more enjoyable. With our cursors, you can pleasantly surprise your loved ones and acquaintances.
A beautiful mouse cursor can be installed on your computer in different ways. They will be discussed in this article. With them you can change the shape of the cursor and give it an original look.
A beautiful mouse cursor, why do we need it?
Hello, friends! While working at the computer, you have to change the computer mouse cursor. What is it for? After all, she already has a standard Windows cursor.
This need arises due to the desire of users to install a beautiful mouse cursor so that its shape and color can change. For example, there is a regular cursor in Windows that seems small and barely noticeable.
You may need to make your cursor larger to quickly type text in Worde without unnecessary spaces. A large cursor is also useful for recording video lessons; this will help the viewer see the actions being performed.
How to set the mouse cursor
So how do you set the mouse cursor? There is nothing complicated here. The main thing is to choose the appropriate method and follow the instructions:
- Automatic placement of the cursor for a computer mouse. This option for installing cursors is suitable for all operating systems. You just need to download a set of cursors from the Internet and install them through a special installer file.
- Manual cursor setting. This method will take you a little time. This way the cursor will be positioned through .
- Create your own cursor. In this case, you can draw a cursor on the service yourself and save it to your computer. This will be discussed later in the article.
We have discussed the methods for setting the cursor. Now, let's move on to the instructions, which will show all the processes for installing cursors in Windows 10 and 7.
Beautiful mouse cursor for Windows 10
Before we install a beautiful mouse cursor, we will find it on the Internet and download it to our computer. To do this, go to any browser and in its search write “Download cursors for a computer mouse” (Screen 1).


Then, you need to click the “Download from server” button (Screen 3).

To download cursors to your computer.
This file downloads quickly and will then appear in downloads on your computer. Next, it is necessary. For example, move a folder from an archive with mouse cursors to your computer desktop.
We downloaded a cursor folder called "LeafSimple". We go into it and find an installation file there with the name “Install.inf” (Screen 4).

Right-click on it and select “Install” from the menu sections. Subsequently, you will have a window open (Mouse Properties) in which you need to click the “OK” button so that the action is confirmed and the mouse cursor is installed.
This is a simple way to set the cursor. There are other options that will be considered further.
Installing mouse pointers for Windows 7
Windows 7 has all the tools to set the mouse cursor. Let's consider the manual method of setting the cursor. First of all, find the cursors you need on the Internet and download them to your computer.

In the window that appears, select the section “Changing mouse pointers” and “Pointers” (Screen 6).


To quickly search for “Mouse Properties,” you can use the search button on your computer. Open the Start menu and write “Mouse” in the search. Next, go to its settings.
You can also use the “Browse” button to download previously downloaded cursors from the Internet from your computer. Click on it in the mouse property and select the folder with pointers on the computer (Screen 8).

If you don’t want to waste time searching and downloading a cursor on the Internet, you can make it yourself. Especially for you on the Internet, a service was found - (www.rw-designer.com/online-cursor-editor), which has all the tools for creating cursors.
The service is easy to use. We go to its page and select the shape of the mouse pointer that you can draw. Next, draw it with a mouse using a pencil at your discretion (Screen 9).

If errors occur while drawing the pointer, it’s okay. Click on the “Eraser” function and simply erase unnecessary lines. You can replace the mouse pointer with a different color by using the color palette on the right side of the service.
When your cursor is ready, click “Download” to download it to your computer (Screen 10).

It can only be installed manually. To do this, repeat the method of setting the cursor through the “Browse” button, which was discussed above, and you will succeed.
Conclusion
We have looked at the best ways to help you install a beautiful mouse cursor on your computer for free. All of them have been tested in practice, you can safely choose any of them. You can create a folder on your computer with indexes that you download from the Internet. This way you will save them and not lose them. All the best!
Receive new blog articles directly to your email. Fill out the form, click the "Subscribe" button
Cursors for the Windows 7 operating system will be an excellent addition to the artisanal personalization of your computer, because a unique cursor for Windows 10 will present its owner as a person who is well versed in the intricacies of setting up the system, and will also bring pleasant variety to the process of working at the computer.
The cursor is perhaps one of the most functionally adaptable controls in all operating systems. However, at the same time it also performs an aesthetic function, because a beautiful mouse pointer for Windows 10 is pleasing to the eye. There is nothing supernatural about how to change the mouse cursor on Windows 7, and anyone can do it.
Setting up mouse pointers
The main cursor formats for Windows 10 will be .ani and its alternative .cur. The first of the presented extensions is used to create an animated pointer, and the second is used primarily for static cursors. Using this information, you can personally begin to create a static or animated index, although it will be easier to find ready-made ones on the World Wide Web.
After a complex choice on the external qualities of the cursor has been made, it is necessary to perform the following manipulations:

Changes take effect immediately after you click Apply, so they are visible until you close the workspace.
If installation from a document called .inf fails, then you need to open the command line (to open it, hold down the Windows + R key combination from the keyboard and type the command cmd. exe in the “Run” window). Then write in it: rundll32 syssetup, SetupInfObjectInstallAction DefaultInstall 128 *path to file*\Installer.inf
A small note! In some assemblies the file. inf will be missing. But don't panic, this means that the automatic installation of the pointer kit will not happen, and the value of each element will have to be configured independently:

Installation instructions on Windows 10
On the latest version of the Windows operating system, minor changes have been made to the interface. To install your own set of pointers to ten, you will need to perform the following steps:

Designing your own kit
 If the packages of colored “arrows” found on the Internet did not bring proper aesthetic satisfaction, there are several ways to create them manually. One of them is to download and install a special program, the task of which will be to create new “arrows”. The essence of the other is make cursor.png picture with a missing background and a mouse pointer design of interest (the desired image size is 128x128, but no more), and then convert it to a .cur file through any conversion program capable of this.
The resulting result is established using standard methods. Its only major drawback is the inability to set the position of the “tip of the arrow” (in the standard version it will be located slightly below the upper left edge of the picture).
Main sites providing cursors
winscreen.ru is a resource that provides numerous materials for complete individual personalization of your device. The site features icons, wallpapers, themes, skins and pointers. The positive aspect is the fast downloading and wide selection of materials provided. Link to access cursors: http://www.winscreen.ru/cursors
winallos.com is another site containing a variety of resources for decorating a personal computer. Its assortment includes wallpapers, themes, fonts, programs and much more that will allow you to turn your car into a unique device. The download is direct, you just need to click on the button. Link to cursor catalog: http://winallos.com/kursory
7 themes. su - also makes it possible to change the appearance of a laptop or PC. It presents a large collection of various tools for completely changing the external shell of the operating system, including cursors for Windows 10. To download from the site, registration is required, which makes it less attractive compared to other sites of a similar profile. Link: https://7themes.su/stuff/kursory_windows/7
In addition to them, there are many different Internet resources that provide access to the selected topic. Therefore, there is no problem in how to change the mouse cursor on Windows 10.
Windows design is a creative process that requires a minimum of time and resources from the modern user. And all thanks to the fact that developers from all over the world are creating more and more customization elements every day, allowing you to change the design of the system interface (and not only). On our website you will find a variety of files for every taste and color, with which you can decorate your desktop, as well as design other components of your computer. In particular, the catalog oformlenie-windows.ru contains themes for the Windows 7, 8, XP desktop, start buttons, welcome and boot screens, gadgets and skins. However, to make the operating system interface look stylish and holistic, we also offer other elements that can not only create harmony, but also add zest to your desktop. Among them: screensavers, video wallpapers, icons, cursors and various programs. If you suddenly have problems working with one or another component, be sure to visit the “How to install?” section, where installation instructions and answers to frequently asked questions about system design are located!